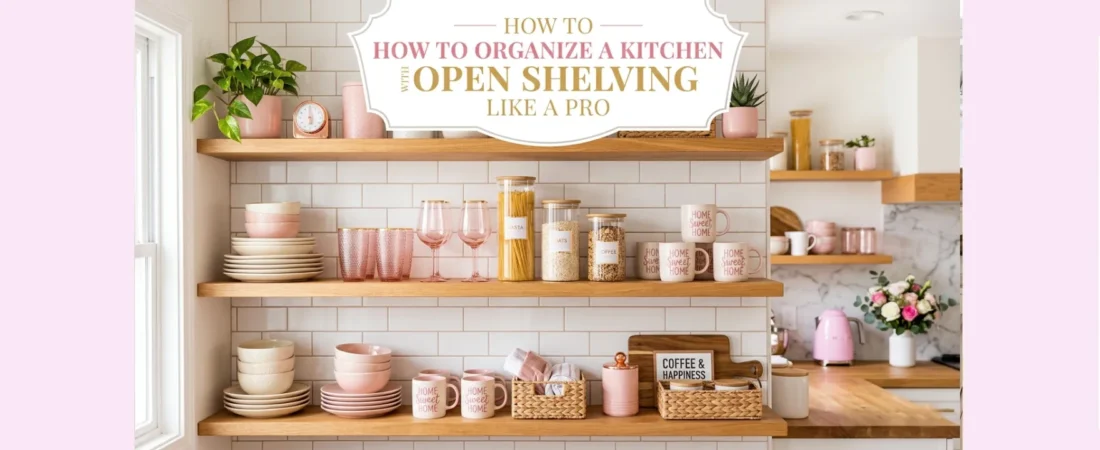
Quick Answer
Organize kitchen open shelving by grouping similar items together, using containers for loose items, placing frequently used items at eye level, and maintaining a visual balance with varying heights and textures. Keep it functional by limiting items to daily essentials and maintaining consistent spacing.
Let me be honest with you – when I first installed open shelving in my kitchen three years ago, I was terrified. After living with closed cabinets for years, the thought of having all my dishes and kitchen items on display felt overwhelming. But I’ve learned so much about organizing open shelving that I can’t imagine going back to closed cabinets now.
The key to successful open shelving isn’t just making it look pretty (though that’s important too). It’s creating a system that actually works for your daily life while maintaining that clean, organized appearance we all crave.
🎯 Start With the Right Mindset
Before diving into organization techniques, I had to shift my thinking completely. Open shelving isn’t just storage – it’s part of your kitchen’s decor. Every item you place on those shelves becomes a design element, which means you need to be more intentional about what stays and what goes.
In my experience, the biggest mistake people make is trying to fit everything they own onto open shelves. This approach leads to cluttered, chaotic-looking spaces that defeat the entire purpose. Instead, I’ve learned to embrace the idea that open shelving should showcase your most beautiful and frequently used items.
💡 Pro Tip: Before organizing, spend a week noting which kitchen items you actually use daily. These are your open shelf candidates – everything else can find a home in closed storage elsewhere.
📏 The Foundation: Proper Spacing and Layout
Getting the basic layout right is crucial. I learned this the hard way after initially cramming too many shelves into my space. Now I follow what I call the “breathing room rule” – each shelf should have enough vertical space that you can comfortably reach items without knocking into the shelf above.
For my setup, I found that 12-15 inches between shelves works perfectly for most dishes and glassware. The bottom shelf sits about 18 inches above my counter, giving me workspace while keeping frequently used items within easy reach.
🔄 Creating Visual Balance
One technique that transformed my open shelving was learning to create visual triangles. I group items in odd numbers and vary the heights to create natural focal points. For example, I might place a tall olive oil bottle next to a medium-height stack of bowls and a short spice jar.

🗂️ The Grouping Strategy That Actually Works
After trying several organization methods, I’ve settled on what I call “zone-based grouping.” Instead of organizing by item type alone, I group items by how I use them together. This approach has revolutionized my cooking workflow.
My coffee station occupies the top right shelf – mugs, coffee beans, filters, and my small French press all live together. My baking zone takes up a middle shelf with measuring cups, mixing bowls, and frequently used ingredients like vanilla and baking powder.
🍽️ The Daily Essentials Shelf
The eye-level shelf is prime real estate in any open shelving system. This is where I keep items I reach for multiple times daily – everyday plates, glasses, and my go-to cooking oils. The key is limiting this shelf to true essentials and maintaining consistent spacing between items.
I’ve found that keeping 2-3 inches between plate stacks and other items creates a cleaner look while making everything easier to grab quickly during meal prep.
📖 Organization Insight: Just like organizing a home office for maximum focus, kitchen organization works best when you design zones around specific activities and workflows.
📦 Container Magic: When and How to Use Them
Containers can make or break an open shelving system. I use them strategically rather than trying to containerize everything. Small, loose items like spice packets, tea bags, or kitchen clips get corralled into matching containers to prevent visual chaos.
My favorite approach is using a mix of clear glass containers for frequently accessed items and attractive ceramic or wooden containers for things I don’t need to see inside. The key is choosing containers that complement your kitchen’s aesthetic while serving a real functional purpose.
🎨 Color Coordination Without Being Boring
I used to think color coordination meant everything had to match perfectly, but that actually creates a sterile, showroom-like feel. Instead, I work with a loose color palette – mostly whites and naturals with pops of my kitchen’s accent color (sage green, in my case).

Using containers and color coordination to create cohesive open shelving
🧹 Maintenance: The Reality Check
Let’s talk about the elephant in the room – dust and grease. Open shelving requires more maintenance than closed cabinets, and I won’t sugarcoat that reality. However, I’ve developed a routine that keeps things manageable without feeling overwhelming.
I do a quick weekly wipe-down of shelves and items, focusing on the areas near my stove where grease tends to accumulate. Monthly, I remove everything from one shelf section and give it a thorough cleaning. This rotating approach means I’m never facing a massive cleaning project.
🔄 The Reset Routine
Every few months, I do what I call a “shelf reset.” I remove everything, evaluate what’s working and what isn’t, and make adjustments. Maybe I’ve accumulated too many mugs, or perhaps my spice organization isn’t holding up. These mini-resets keep my system functional and prevent gradual decline into chaos.
Similar to how desk organization requires regular maintenance to prevent paper pile-ups, open shelving needs consistent attention to maintain its organized appearance.
🎪 Styling Without Sacrificing Function
The beauty of open shelving lies in making functional items look intentionally styled. I’ve learned to embrace the “collected over time” look rather than trying to achieve magazine perfection. My shelves include a mix of everyday dishes, a few decorative elements like small plants or pottery, and practical storage solutions.
One styling trick that’s made a huge difference is incorporating varying textures – smooth ceramics, woven baskets, glass containers, and wooden elements. This creates visual interest without requiring elaborate arrangements.
💡 Reality Check: Don’t feel pressured to fill every inch of shelf space. Empty space is actually crucial for both visual appeal and functional access to your items.
❓ Frequently Asked Questions
How do I keep open shelves from looking cluttered?
The secret is restraint. I follow the “two-thirds rule” – never fill more than two-thirds of any shelf space. This leaves room for visual breathing space and makes accessing items much easier. Also, stick to items you actually use regularly rather than trying to display everything you own.
What’s the best way to organize dishes on open shelves?
I organize dishes by frequency of use and visual weight. Heavy items like dinner plates go on lower shelves for safety and accessibility. Lighter items like bowls and cups work well on upper shelves. Stack similar items together, but don’t make stacks too high – I never go above 6-8 plates in a stack.
How do I deal with items that don’t look good on display?
Honestly, not everything belongs on open shelves. Plastic containers, mismatched lids, and bulky appliances can find homes in closed storage, pantry areas, or even garage shelving systems if you have the space. Open shelving should showcase your most attractive and frequently used items.
Should I invest in matching dishes for open shelving?
Not necessarily! While matching dishes can create a cohesive look, I actually prefer a curated mix that tells the story of how I cook and live. The key is finding common elements – similar colors, compatible styles, or consistent materials – that tie everything together without being too matchy-matchy.
🎉 Your Open Shelving Success Story Starts Now
Organizing kitchen open shelving successfully comes down to finding the right balance between beauty and function for your specific needs and lifestyle. It’s taken me years to perfect my system, and it continues to evolve as my cooking habits and aesthetic preferences change.
Remember, the goal isn’t to create a picture-perfect kitchen that’s afraid to be used. The best open shelving systems are ones that make your daily cooking routine easier while creating a space you genuinely love spending time in.
Start small, be patient with yourself as you find what works, and don’t be afraid to make adjustments along the way. Your open shelves should serve your life, not the other way around.
I’d love to hear about your open shelving journey! What’s your biggest challenge with organizing open kitchen shelves? Share your experiences and questions in the comments below – let’s help each other create kitchens that are both beautiful and brilliantly functional.